This post goes into the different steps I’ve taken to get started with integrating PayPal in my AppEngine Java application. I couldn’t find a clear list of steps to take in the PayPal documentation, so I’m sure other developers will find the following summary very useful.
As I progress with my PayPal integration, you’re probably going to see a few more posts like these. These help me clarify what needs to be done and hopefully they’ll help others. The PayPal documentation is a mess, it’s all there, it’s just very very hard to find the things relevant to you. I hope this post gives some insight.
My previous post tried to summarize all the PayPal APIs available. If your business is outside of the United States, it’ll be a whole lot easier:
There are no choices to make. All the “pro” APIs are for United States businesses only and, sometimes, a few choice countries (usually UK and Canada, but be careful, it depends).
So most of the world will have to do with:
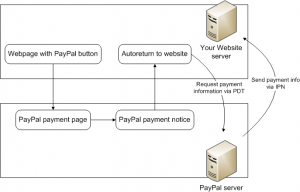
- Payment Data Transfer (PDT) messages when users are redirect to your page. This is fairly unreliable, because your user might close down his browser and you’d have no idea that he paid.
- Instant Payment Notification (IPN) updates send directly to your server from the PayPal servers. Messages will always be sent, although I don’t think there is a guarantee on how long delivery could take.
- Supporting both of the above. Which I believe is the only solution that is foolproof and will always give your users immediate access to the services they paid for.
The basic webpage flow and server-to-server communications look like this (click for a larger version):
The steps you’ll need to take to get this working are as follow. I haven’t completed the full integration process, so the last few are a bit less detailed:
- Set up at least one buyer and a business account on the PayPal sandbox environment. You’re best bet is to skip the wizard and create fully customized accounts. There’s minimal guide available to get you started with the sandbox.
- Build a IPN handling servlet. PayPal just sends a bunch of name/value parameters which you have to interpret. This document has an appendix with all the variables.
- Take a close look at the IPN chapter in this guide. It’ll explain how to validate notification. PayPal doesn’t force you to do this but for the safety of your site and users, you’d better do. Also see the guide for item 2 if you want additional information.
- Test your servlet with the developer tools. You can make PayPal send pretty much any IPN notification you want. Although it’s fairly difficult to exactly reconstruct the ones you’ll actually receive, at least it will take care of obvious bugs in the servlet and you can also verify that validations is working.
- With your business account, log in to the system and create the payment button(s) you need. There are many guides available for creating just the right button, but if you got this far, you probably don’t need them.
- Put the buttons on your test site and try them out with your buyer account (this is about where I am right now).
- Configure autoreturn and PDT with the business account.
- Implement PDT in your application. See the guide mentioned in item 3 or see the Payment Data Transfer pages.
- Configure your IPN receiver (you do this in the properties of your business account).
- Test your application.
- Set up everything the same in a production environment.
- Go live
If you have any other resources, I’d love to hear about them. Or if you want a little more information on any of the items, let me know and I’ll elaborate.

